Get Started ― nlux And ChatGPT API From Browser (unsafe)
OpenAI provides very powerful APIs to access their GPT chat completion models.
In this guide, we will use nlux and ChatGPT APIs to create a simple chatbot in the browser.
The adapters used in this getting started page are simple to use but they should only be used for prototyping and testing purposes. As they connect to OpenAI API directly from the browser, exposing the API key in the client-side code. This approach is unsafe and not recommended for production use cases.
- Node.js and nlbridge ― to create a Node.js server that connects to the OpenAI API, and easily use it with nlux.
- nlux's custom adapters feature ― to create an adapter for any backend or API.
nlux is available as a React JS component and hooks, or as a Javascript library.
The features are identical for both platforms.
Use the version that best suits your needs.
- React JS ⚛️
- Javascript 🟨
nlux + ChatGPT + React JS
This guide will walk you through the steps to add nlux conversational capabilities to a React JS app.
It assumes that you already have a React JS app set up.
If you don't have a React JS app set up yet, and you are looking for a quick way to get started, you can use
Vite's react-ts template to quickly set up a React JS app.
Set up a React JS project with vite
Use the following npm commands to set up a React JS app with Typescript using Vite's react-ts template:
npm create vite@latest my-ai-chat-app -- --template react-ts
cd my-ai-chat-app
npm install
npm run dev
The last command will start the development server and open the app in your default browser.
nlux + ChatGPT + Javascript
This guide will walk you through the steps to add nlux conversational capabilities to a vanilla Javascript app.
It assumes that you already have a Javascript development environment set up, with support for ES6 and npm modules.
If you don't have a development environment set up, and you are looking for a quick way to get started, you can use
Vite's vanilla-ts template to quickly set up a
development environment with support for ES6 and npm modules.
Set up a Typescript project with vite
Use the following npm commands to set up a new project with the vanilla-ts template:
npm create vite@latest my-ai-chat-app -- --template vanilla-ts
cd my-ai-chat-app
npm install
npm run dev
The last command will start the development server and open the app in your default browser.
1. Get Your OpenAI API Key
- react-js
- javascript
Start by getting a new API key from OpenAI.
- If you don't have an account, go to the OpenAI signup page and create an account.
- Go to the API keys page
- Click the
Creat new secret keybutton
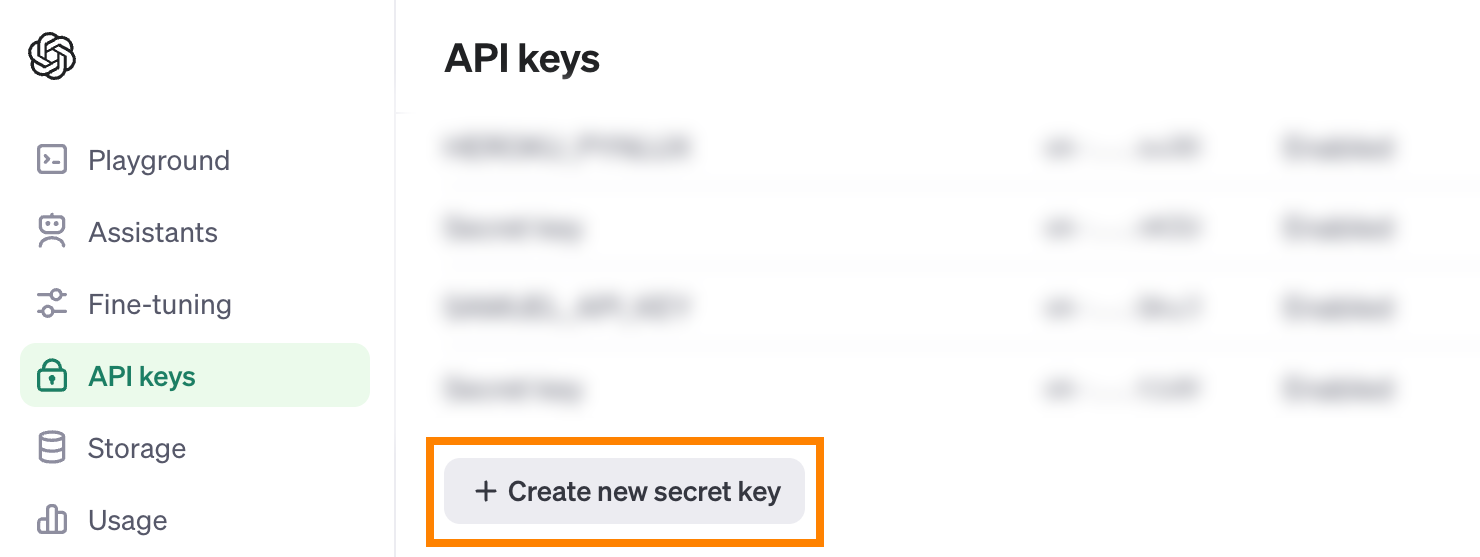
- Give your API key a name and click
Create secret key - Copy the API key and save it in a safe place. You will need it to configure the OpenAI nlux adapter.
Start by getting a new API key from OpenAI.
- If you don't have an account, go to the OpenAI signup page and create an account.
- Go to the API keys page
- Click the
Creat new secret keybutton
- Give your API key a name and click
Create secret key - Copy the API key and save it in a safe place. You will need it to configure the OpenAI nlux adapter.
2. Install nlux Packages
- react-js
- javascript
You can start by adding nlux to your React JS app using your favorite package manager. At the root of your project, run the following command:
- NPM
- Yarn
- PNPM
npm install @nlux/react @nlux/openai-react
yarn add @nlux/react @nlux/openai-react
pnpm add @nlux/react @nlux/openai-react
This will install the @nlux/react and @nlux/openai-react packages.
You can start by adding nlux to your Typescript project using your favorite package manager. At the root of your project, run the following command:
- NPM
- Yarn
- PNPM
npm install @nlux/core @nlux/openai
yarn add @nlux/core @nlux/openai
pnpm add @nlux/core @nlux/openai
This will install the @nlux/core and @nlux/openai packages.
3. Import Component And Hook
- react-js
- javascript
Import the useUnsafeChatAdapter hook and the AiChat component in your JSX file:
import {AiChat} from '@nlux/react';
import {useUnsafeChatAdapter} from '@nlux/openai-react';
The AiChat component is the main chat component that you will use to display the chat UI.
The useUnsafeChatAdapter hook is used to create an adapter for the OpenAI Chat Completion API.
Import the createAiChat and createUnsafeChatAdapter functions from the @nlux/core and @nlux/openai packages.
import {createAiChat} from '@nlux/core';
import {createUnsafeChatAdapter} from '@nlux/openai';
The createAiChat function will create the main chat component that you will use to display the chat UI.
The createUnsafeChatAdapter function is used to create an adapter for the OpenAI Chat Completion API.
4. Create ChatGPT Adapter
- react-js
- javascript
You can use the useUnsafeChatAdapter hook to create an OpenAI adapter.
You can optionally import ChatAdapterOptions from @nlux/openai-react to define the type of the options object.
const adapterOptions: ChatAdapterOptions = {
    apiKey: 'your-openai-api-key-here',
    model: 'gpt-3.5-turbo',
    systemMessage: 'Act as a helpful assistant and be funny and engaging.',
};

export const App = () => {
    const openAiAdapter = useUnsafeChatAdapter(adapterOptions);
}
The useUnsafeChatAdapter hook takes config parameters and returns an adapter object. Please refer to
the reference documentation for more information on the available options.
You can use the createUnsafeChatAdapter function to create a OpenAI adapter as shown below:
const openAiAdapter = createUnsafeChatAdapter()
    .withApiKey('your-openai-api-key-here')
    .withModel('gpt-3.5-turbo')
    .withSystemMessage('Act as a helpful assistant and be funny and engaging.');
The createUnsafeChatAdapter function returns an adapter builder that you can be configured by chaining methods.
Please refer to the reference documentation for more information on the available methods.
5. Create Chat Component
- react-js
- javascript
Now that we have the OpenAI adapter, we will create the chat component and pass the adapter to it.
import {AiChat} from '@nlux/react';
import {useUnsafeChatAdapter, ChatAdapterOptions} from '@nlux/openai-react';

const adapterOptions: ChatAdapterOptions = {
    apiKey: 'your-openai-api-key-here',
    model: 'gpt-3.5-turbo',
    systemMessage: 'Act as a helpful assistant and be funny and engaging.',
};

export const App = () => {
    const openAiAdapter = useUnsafeChatAdapter(adapterOptions);

    return (
        <AiChat
            adapter={openAiAdapter}
            promptBoxOptions={{
                placeholder: 'How can I help you today?'
            }}
        />
    );
};
The AiChat component can take several parameters:
- The first parameter
adapteris the only required parameter, and it is the adapter that we created earlier. - The second parameter that we provide here is an object that contains the prompt box options. In this case, we are
passing a placeholder text
placeholderto customize the prompt box.
For full documentation on how to customize the AiChat component, please refer to the AiChat documentation.
Now that we have the OpenAI adapter, we will create the chat component, pass the adapter to it, and mount it to the DOM.
const openAiAdapter = createUnsafeChatAdapter()
    .withApiKey('your-openai-api-key-here')
    .withModel('gpt-3.5-turbo')
    .withSystemMessage('Act as a helpful assistant and be funny and engaging.');

const aiChat = createAiChat().withAdapter(openAiAdapter);

document.addEventListener('DOMContentLoaded', () => {
    const chatContainer = document.getElementById('chat-container');
    aiChat.mount(chatContainer!);
});
The function createAiChat() returns a component builder that allows you to configure the chat component
by chaining method calls. The withAdapter() method sets the adapter to be used by the chat component.
Note that aiChat.mount(<domElement>) should only be called after the DOM has been loaded.
For full documentation on how to customize the aiChat component, please refer to the AiChat documentation.
6. Add CSS Styles
- react-js
- javascript
nlux comes with a default CSS theme that you can use to style the chat UI. There are 2 ways to import the stylesheet, depending on your setup.
Using JSX Bundler
You can import it in your JSX component file by installing the @nlux/themes package:
- NPM
- Yarn
- PNPM
npm install @nlux/themes
yarn add @nlux/themes
pnpm add @nlux/themes
Then import the default theme nova.css in your React component:
import '@nlux/themes/nova.css';
This will require a CSS bundler such as Vite, or Webpack that's configured to handle CSS imports for global styles. Most modern bundlers are configured to handle CSS imports.
Using HTML Link Tag
Alternatively, you can include the CSS stylesheet in your HTML file.
We provide a CDN link that you can use to include the stylesheet in your HTML file:
<link rel="stylesheet" href="https://themes.nlux.ai/v1.0.0/nova.css" />
This CDN link is not meant for production use, and it is only provided for convenience. Make sure you replace it with the latest version of the stylesheet before deploying your app to production.
nlux comes with a default CSS theme that you can use to style the chat UI. There are 2 ways to import the stylesheet, depending on your setup.
Using JS Bundler
You can import it in your JS module by installing the @nlux/themes package:
- NPM
- Yarn
- PNPM
npm install @nlux/themes
yarn add @nlux/themes
pnpm add @nlux/themes
Then import the default theme nova.css in your webpage page or Javascript/Typescript file:
import '@nlux/themes/nova.css';
This will require a CSS bundler such as Vite, or Webpack that's configured to handle CSS imports for global styles. Most modern bundlers are configured to handle CSS imports.
Using HTML Link Tag
Alternatively, you can include the CSS stylesheet in your HTML file.
We provide a CDN link that you can use to include the stylesheet in your HTML file:
<link rel="stylesheet" href="https://themes.nlux.ai/v1.0.0/nova.css" />
This CDN link is not meant for production use, and it is only provided for convenience. Make sure you replace it with the latest version of the stylesheet before deploying your app to production.
7. Run Your App
- react-js
- javascript
Once you have configured all of the above, your code will look like this:
import {AiChat} from '@nlux/react';
import {useUnsafeChatAdapter, ChatAdapterOptions} from '@nlux/openai-react';
import '@nlux/themes/nova.css';

const adapterOptions: ChatAdapterOptions = {
    apiKey: 'your-openai-api-key-here',
    model: 'gpt-3.5-turbo',
    systemMessage: 'Act as a helpful assistant and be funny and engaging.',
};

export const App = () => {
    const openAiAdapter = useUnsafeChatAdapter(adapterOptions);

    return (
        <AiChat
            adapter={openAiAdapter}
            promptBoxOptions={{
                placeholder: 'How can I help you today?'
            }}
        />
    );
};
You can now run your app and test the chatbot.
The result is a fully functional chatbot UI:
And nlux is handling all the UI interactions and the communication with the OpenAI API.
Once you have configured all of the above, your code will look like this:
import {createAiChat} from '@nlux/core';
import {createUnsafeChatAdapter} from '@nlux/langchain';
import '@nlux/themes/nova.css';

const openAiAdapter = createUnsafeChatAdapter()
    .withApiKey('your-openai-api-key-here')
    .withModel('gpt-3.5-turbo')
    .withSystemMessage('Act as a helpful assistant and be funny and engaging.');

const aiChat = createAiChat().withAdapter(openAiAdapter);

document.addEventListener('DOMContentLoaded', () => {
    const chatContainer = document.getElementById('chat-container');
    aiChat.mount(chatContainer!);
});
You can now run your app and test the chatbot.
The result is a fully functional chatbot UI:
And nlux is handling all the UI interactions and the communication with the OpenAI API.